
The results of your selections will appear in the Results Grid. Please note that the results are limited to 3000 rows. If your results are greater than 3000 rows, you will need to use the Employee Filter or Domain Filter to limit your results.
If you have made selections in View by Course, each row of the results grid displays data for one user. Select the checkbox at the far left of each user you want to update enrollment or completion data on.
If you have made selections in the View by Person, each row displays data for one course.

Only the Name/Course column is different. The other columns are the same for each set of results.
The Status column displays the user's status in a course. Statuses can be grouped in three categories:
The Hours and Minutes columns indicate course length. These can be edited. Score can also be adjusted on this screen.
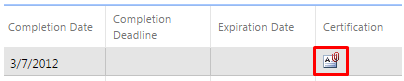
The Completion date is the date the course was completed, and the Completion Deadline is the date by which the course should be completed. If a course is on a user's Learning Plan due to expiration, this date will automatically be the date that the course is due to expire. These fields can be edited.
The Expiration Date is the date that the previous course completion is due to expire. This field cannot be changed as it is automatically set based on the expiration criteria set at the resource level.
A certificate of completion can only be loaded for a for a user that has a Complete status in the course. To load the certificate of completion, click on the certificate icon next to the user's completion.
A pop-up will open, prompting you to select a certificate to upload. Click Select and navigate to the appropriate document.
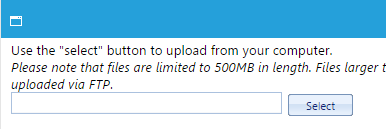
As soon as you select the document, the system will automatically upload it. A magnifying glass will now be shown next to the certificate icon indicating that a certificate has been uploaded.

You can click on the magnifying glass to view the uploaded certificate.
If needed, multiple certificates can be loaded for a single employee for the same resource.
Note: If the course already has a default completion certificate associated with it, this certificate will automatically appear in the user's Learning History on the LMS. You do not need to manually upload it. Based on your system configuration, both the default completion of certificate and the manually loaded certificate of completion may be available on the user's history.
